Deploying Kubernetes Locally:
Kind Cluster Development with Docker

Kubernetes is an open-source container platform that is taking the scene of the cloud-native environment. Packages were the advancement the last few years, where containerization is that of the next. Managed Kubernetes services are becoming the most popular of the DevOps toolsets for technology services across the globe.
Continuous development and deployment relies on the ability to forward and rollback code-bases in an efficient and stable manner. If you are at this point, you are most likely familiar with the service, and looking to run a local instance of a Kubernetes cluster for development.
Kubernetes Localized Container Deployment

There are many technologies for deploying, monitoring, and securing Kubernetes (clusters, namespaces, deployments, pods, and services). It can be expensive to form and build configurations on a running cluster — although many managed services expose the same API (Application Programming Interface) & CLI (Command-Line Interface) configurations, finding a free solution to define the configuration can be a great way to start and continue.
Docker
A PaaS (Platform as as Service) operating system virtualization platform that creates a connective path to run-times for container software on operating systems.
Docker enables the creation of files for building containers and deploying software within virtual environments, on machine, premise servers, and cloud.
Kind
A tool for running Kubernetes Clusters in Docker Nodes. Provides a Kubernetes environment for Kubernetes services & testing through Docker desktop.
KubeCTL
A command line tool for connecting to Kubernetes APIs and performing functions within Kubernetes services.
Deploying to a Kubernetes Cluster Locally

With the combination of the aforementioned tools, you can quickly create a Kubernetes cluster for building, testing, and configuring services before deploying to the cloud.
Local development provides hands on experience without the risk of breaking services or cost of non-production applications that can add up quickly.
Step One (1): Install Docker Hub
Find the correct Docker Hub for your operating system and begin the usual software installation.
Step Two (2): Enable Kubernetes
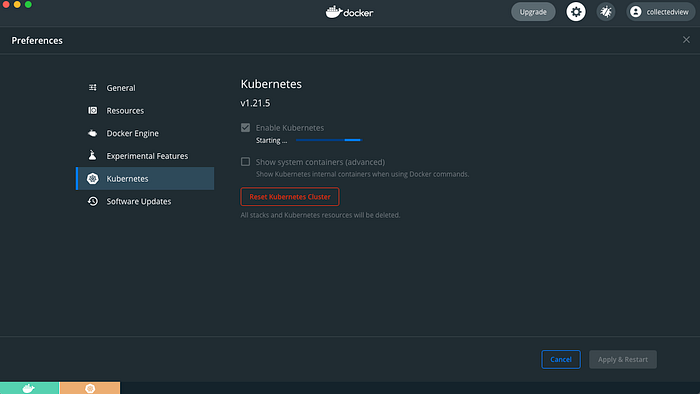
In Docker Hub open the preferences by clicking the ‘Gear Icon’ in the top left of the application. In the left menu navigate to ‘Kubernetes’, check the ‘Enable Kubernetes’ box and then click ‘Apply & Restart’.
Step Three (3): Install Kind
Open your terminal or command line shell, and follow the Kind — ‘Quick Start’ documentation to get the latest package.
// Mac
brew install kind// Windows
choco install kind
Step Four (4): Install KubeCTL
Once again, terminal or command line shell, and this time follow the KubeCTL — ‘Getting Started’ documentation.
// Mac
brew install kubectl// Windows
choco install kubernetes-cli
Step Five (5): Create Your Cluster
Check to see if you have any Kubernetes/Docker nodes running locally with KubeCTL, there should be a Node from Docker, any other do note for naming conventions.
kubectl get nodes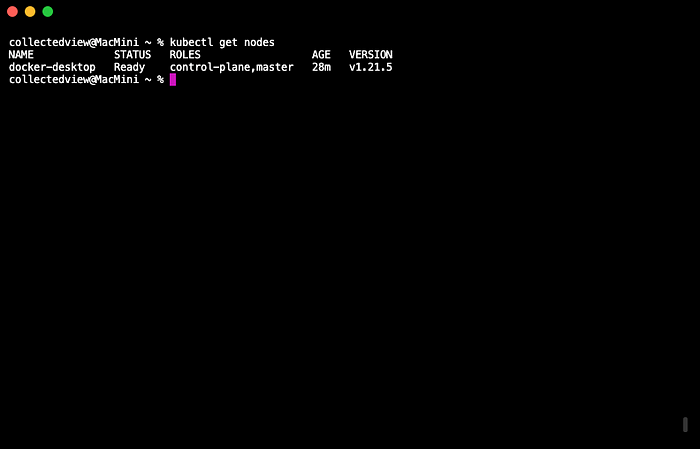
Create a named Kind cluster with the Kind CLI tool, replace the cluster name in arrows with your own.
kind create cluster --name <cluster name>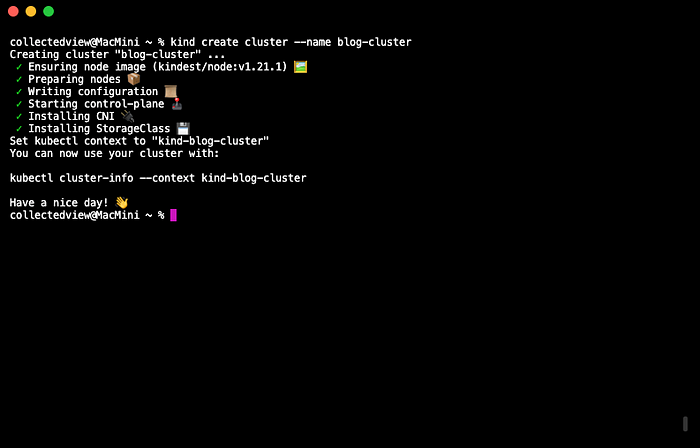
You can check to see if your cluster finished through the Kind CLI tool.
kind get clustersMake sure to set the context for you new Kind Cluster by running the printed KubeCTL command. This will dictate which Kubernetes Cluster you are addressing.
kubectl cluster-info --context kind-<cluster name>Once context is set the access information will be printed in the console, this is the API space where the cluster is running on your local machine.

You are now set with a Kubernetes Cluster on you local development machine, all of the features of Kubernetes are now accessible through the command line interface. You can access the documentation for deploying files & images to this cluster from the mentioned tools sites — Docker, Kind & KubeCTL.
Managing a Kubernetes Cluster Locally
There are many commands for building, deploying, and connecting to your local cluster, similarly as there are with remote clusters. The ability to visualize and manage the Kubernetes service is made much easier with an interface.
Kubernetes provides a dashboard for connecting to services running locally and remotely by building an image to the default cluster. Once the cluster has a dashboard, provisioning services, and monitoring becomes a much more familiar process.
This is the same dashboard you see on many managed Kubernetes Services, and will provide insight on how to manage and maintain these technical services.
Step One (1): Create a Directory for Your Files
Create a folder in a local directory where you store code, called kubernetes-dashboard, you can also do this in the command line.
mkdir ~/kubernetes-dashboard && cd ~/kubernetes-dashboardStep Two (2): Set Context for Your Cluster
In the previous steps you followed to establish your cluster, you also set the context. You should/need to change context each time you access a different cluster, so revisit the connection to be sure you have the correct cluster.
You can check the context first, in your config, with KubeCTL — you should do this for each cluster change.
kubectl config current-contextThen set the context if you need to, so that you access the cluster where you would like to deploy the dashboard.
kubectl config use-context <cluster name>Step Three (3): Deploy the Dashboard Image to Cluster
Images and files create the services within Kubernetes, this images originates from Kubernetes to deploy the version of the dashboard to the cluster, make sure to get the latest image from the Kubernetes Documentation.
Deploy the following image or the latest dashboard image to your set cluster with the KubeCTL apply file command.
kubectl apply -f https://raw.githubusercontent.com/kubernetes/dashboard/v2.3.1/aio/deploy/recommended.yamlYou can then check with KubeCTL to see if those pods were created to support you Kubernetes Dashboard, they should be under the namespace ‘kubernetes-dashboard’.
kubectl get pods -AStep Four (4): Create an Admin User
Open the folder that you created earlier and create a .YAML file called ‘admin.yaml’.
This file will be used to generate access to the dashboard. In the file paste the following contents and then save the file.
apiVersion: v1kind: ServiceAccountmetadata:name: adminnamespace: kubernetes-dashboard---apiVersion: rbac.authorization.k8s.io/v1kind: ClusterRoleBindingmetadata:name: adminroleRef:apiGroup: rbac.authorization.k8s.iokind: ClusterRolename: cluster-adminsubjects:- kind: ServiceAccountname: adminnamespace: kubernetes-dashboard
To deploy this file run apply file with KubeCTL command again in the root of your ‘kubernetes-dashboard’ folder.
kubectl apply -f admin.yaml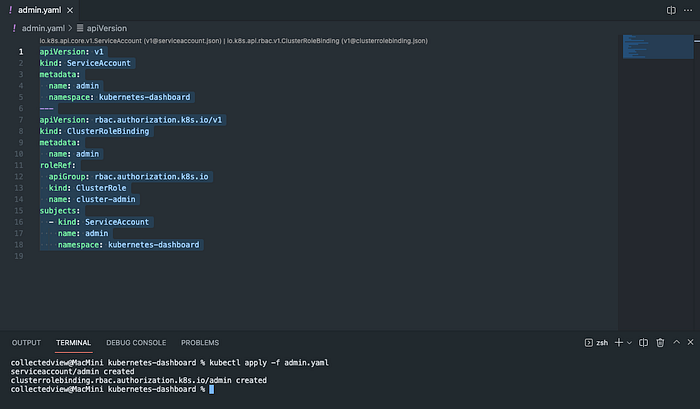
Step Five (5): Generate Access Token
Logging into the Kubernetes dashboard locally requires an access token, this is often generated by the service provider, though here it is required to generate one locally.
Through KubeCTL get the service account token as JSON, remember to save this token from the console to paste into the login.
kubectl get secret -n kubernetes-dashboard $(kubectl get serviceaccount admin -n kubernetes-dashboard -o jsonpath="{.secrets[0].name}") -o jsonpath="{.data.token}" | base64 --decode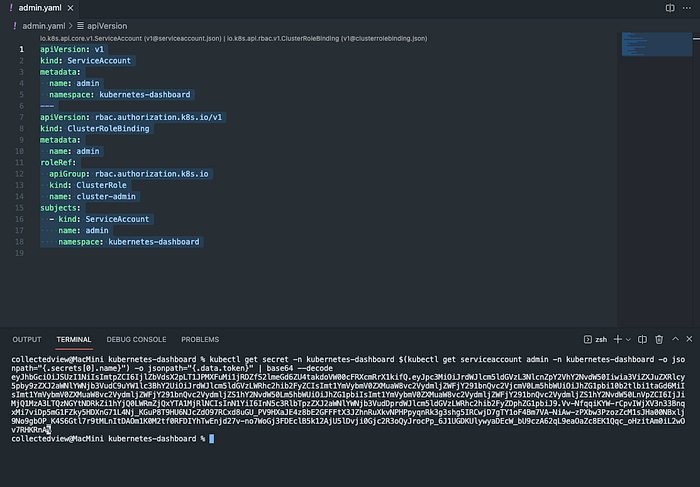
Step Six (6): Access Local Kubernetes Dashboard
Accessesing the dashboard requires exposing the endpoint of Kubernetes to the local host so that you can open it in your browser.
Expose the port to serve local access with KubeCTL through proxy.
kubectl proxyYou should now be able to access your local Kubernetes Dashboard via the exposed cluster endpoint at http://localhost:8001/api/v1/namespaces/kubernetes-dashboard/services/https:kubernetes-dashboard:/proxy/.
Once you have the dashboard open, select ‘Token’, paste the token you generated previously and click ‘Sign In’.

Step Seven (7): Create a Namespace
Now that you have access to a cluster and a full dashboard, locally you should create a namespace to partition the cluster and services, this will be referenced in later files, and help preserve interference from the other services on the cluster.
Click the plus symbol on your dashboard to open a pane to ‘Create New Resource’.
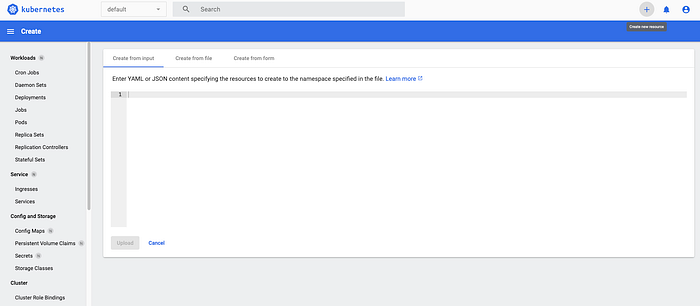
You can create a new namespace with a simple configuration here, below are the files to either apply files with KubeCTL through the command line or even more directly, uploading with the dashboard.
In the .YAML file, replace the cluster namespace name in arrows with your own and then click ‘Upload’.
apiVersion: v1
kind: Namespace
metadata:
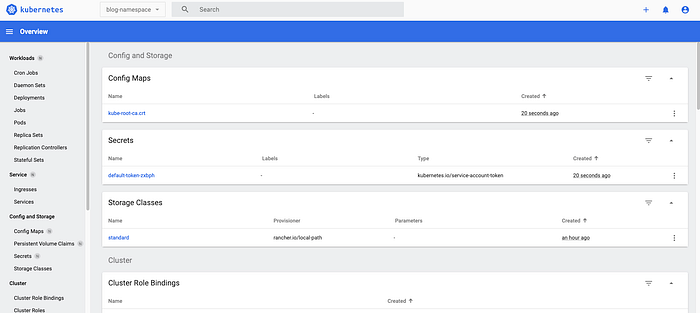
name: <cluster namespace name>Now that the namespace has been created, you can create services, deployments, pods and access any of the Kubernetes APIs within this partition, even deleting it to remove its contents.
You can find out more about this configuration file in the Kubernetes Documentation. To see your new namespace & services running within, click the select dropdown in the top left corner to select your namespace.
Kubernetes & Docker Local Cluster Builds
Now that you have a locally running cluster, dashboard, and namespace, you can access, monitor, and build images for and from your software applications. These are the core features to establishing a process for simplifying Kubernetes development while staying in the confines of your machine.
There are many existing images for your favorite languages as well, tutorials within Docker for creating container images to deploy to Kubernetes. Access these all from your local machine means saving cost, cutting errors, and gaining experience without the chance of altering existing services.